Description[]
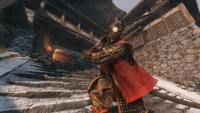
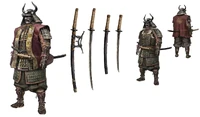
General Kuranosuke Matsumoto (侍大将 松本内蔵佑, Samurai General Matsumoto Kuranosuke) is a Mini-Boss with two Deathblow Counters.
As the First Prayer Necklace states, Ashina Generals are skilled samurai trained in the Ashina sword style.
Location[]
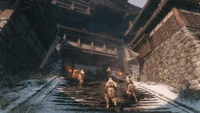
- Ashina Castle: at the top of the staircase past the Sculptor's Idol, delivering a speech to his troop.
Behavior and Tactics[]
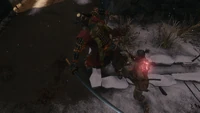
 Perilous Grab: This attack is almost always performed when Sekiro's posture is broken and he falls to his knees. Performing a safety roll backward is the best way to avoid this attack.
 Perilous Low Wide Swing: a wide sweeping attack across the ground. As with all unblockable sweeps, this cannot be parried, but can only be countered by a jump-kick.
 Perilous Thrust: a well telegraphed thrust attack. As with all unblockable thrusts, this attack can be parried, but only with a perfect deflection. Performing a Mikiri Counter is the safest and most effective method of dealing with this attack.
 Perilous Thrust Combo: two vertical slashes and a Perilous Thrust.
- Chasing Slice: the General sheathes his weapon, entering a crouched stance, and will then rush forwards with a vertical slice.
- Jab and Kick: hits his target with the hilt of his sword, following up with a kick. He may follow up with Perilous Low Wide Swing. The kick deals no vitality damage and will simply knock the player over if it connects.
- Jump Slash: leaps into the air and follows up with a downward overhead slash. Can be avoided horizontally.
- Overhead Swing: a single overhead swing. This attack has a greater amount of recovery frames and fewer follow-ups than most of his attacks, and as such, is a safe attack to retaliate after. Can also be avoided by dashing to the sides.
- Recover: the General jumps backwards and during the charge becomes engulfed in a bright aura, that will restore his Posture significantly. Being interrupted at any point before the end of this move will prevent any Posture regeneration.
- Shoulder Check and Slash: the General leads with a blunt shoulder check attack and follows up with a horizontal swipe. Unlike the kick, this shoulder check does vitality damage if not blocked or deflected.
- Two-swing Slash: consecutive swings side by side.
Prior to challenging Matsumoto, it's recommended to dispatch the four Ashina Riflemen surrounding him. There are a plethora of ways to go about doing this. One method involves using hit and run tactics. Stealth-blow or aggressively kill one Rifleman, then flee to the surrounding rooftops, or leave the immediate vicinity. In time, the enemies will stop searching and forget about you. Rinse and repeat until all the Riflemen are dead. Another method utilizes the Bloodsmoke Ninjutsu. Sneak up on and stealth-blow the first Rifleman, and perform the Bloodsmoke Ninjutsu. The resulting stealth gives you enough time and freedom to dispatch at least one more of the Rifleman, two if you're quick enough. This leaves one or two Rifleman alive, who can either be killed immediately afterwards, or upon leaving the area and regaining stealth. Since enemies hit by a Shuriken don't draw the attention of surrounding allies, this Prosthetic Tool can safely take out each Soldier one by one.
It is not entirely necessary to kill all the Rifleman before challenging Matsumoto, as previously mentioned: killing the two Rifleman closest to the large door at the base of Ashina Castle allows you to safely bait Matsumoto into the small alcove directly to the left of said door, above where Fujioka is found. First it's necessary to kill the Brown Nightjar on the pagoda that overlooks the passageway to not risk having him constantly throwing shurikens during the fight. The Riflemen left will not follow the General, allowing to safely duel Matsumoto.
Otherwise drop down to the ground floor of the castle from the Upper Tower - Antechamber Sculptor's Idol and open the front door to sneak behind the General: the Riflemen won't be able to hit Wolf, if he remains inside the building.
Keeping constant pressure on him will fill his Posture Bar fast: after 3 or 4 hits, he'll perform a deflection and will follow it up mostly with either an Overhead Swing or a Jump Slash. Note that, while the latter can be interrupted by landing enough attacks in time, the former can't.
When far away from the player, he often starts charging up a Chasing Slice while approaching the player: this can be interrupted with a properly timed katana swing or a Shuriken.
Dodge his swipes backward and his overhead swings to the left.
When his Posture Bar is nearly full, he'll dash backward and attempt to peform his Recover ability to restore his Posture, so it's important to always be ready to interrupt him by either catching up to him or by using Shurikens, which prevent the need of exposing oneself to any of the Riflemen.
Loot[] | |||
| +280 Skill Experience | |||
| Prayer Bead | |||
| Dialogue | ||
|---|---|---|
| At the entrance of Ashina Castle | I'm sure you are all aware already. This coming battle will determine the fate of all Ashina. We go now to risk our lives for Lord Isshin and the people of Ashina. We are Ashina... We are unbreakable! Arrrghh! For Ashina! | |
Notes[]
- As the first invasion of Ashina Castle by the Central Forces is triggered, this Mini-Boss will disappear for the rest of the playthrough. However, the Prayer Bead that he would have dropped will still be available in the Offering Box next to Hanbei for
 1500.
1500.


